

How to prime your buffing pads - How much product to use?
Use an "ample" amount of product
When I say use an ample amount of product this means don’t use too much product and don’t use to little product.
From The Free Dictionary.com
Out of the above definitions, I`m using the 3rd definition.am·ple
adjective
1. Of large or great size, amount, extent, or capacity: an ample living room.
2.
a. Large in degree, kind, or quantity: an ample reward.
b. More than enough: ample evidence.
3. Fully sufficient to meet a need or purpose: had ample food for the party.
Using too much productSo you want to use an ample amount of product but this can be different depending upon where you`re at in the process. For example,
If you use too much you can hyper-lubricate the surface and this will make it more difficult for the abrasives to abrade the surface as they’ll tend to want to glide or slip over the surface instead of bite into the surface.
Using too little product
If you use too little product there won’t be enough lubrication to enable the buffing pad to rotate and thus engage the abrasives against the surface so they can bite into and remove small particles of paint.
- When you`re first starting out and your pad is dry you`ll need to first prime the pad, (that uses product), and then place some product on the face of the pad, this means some more product.
Here are 3 ways to apply product to your pad.
- After the pad is broken in you`ll only need to add fresh product to the face of the pad.
1. Priming the pad then adding product to work with
Priming a clean, dry pad is considered the best approach because it ensures that 100% of the working surface of the pad is wet with product and working at maximum efficiency when you turn the polisher on.
Priming the pad also ensures that you don`t have any dry portion of the pad working over the paint un-lubricated. This really isn`t a risk because since you`re just starting out you`re going to be removing defects a lot more serious than would be caused by any portion of the pad that is dry and spinning against the paint. I originally learned of this technique from my friend Kevin Brown.
Plus, after just a few passes, the product you apply to specific areas of the face of the pad will migrate over the entire face of the pad and it will do this rather quickly when you`re on the higher speed settings.
Priming the Pad - For clean, dry pads
Start with a clean, dry pad and add some fresh product to be spread out to the face of the pad. Using your finger, spread the product out over the pad and then using your finger work it into the pores of the pad. Don`t saturate the pad, just use enough product to make sure that 100% of the working face of the pad has product coverage.
Work the product around the face of the pad and into the pores

Any extra, take and apply to the outer edge until 100% of the working face of the pad is primed with product.
As an option you can also prime the outer edge. This helps if you`re buffing around convex curves or around panels that the edge of your buffing pad may come into contact with, like spoilers, side mirror housings, curved panels etc.
Primed and ready to add "Working Product" to.


Adding "Working Product" to the primed pad
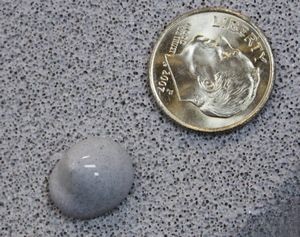
Some people will recommend 3 to 4 pea size drops of product as the proper amount of product to use and this can be correct for concentrated products or working small sections and if you follow this advice make sure you are not under-lubricating the surface being worked.
Pea size drops of product
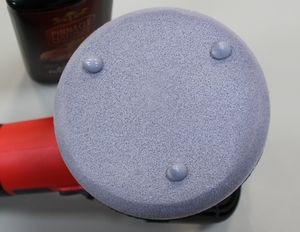
For some products and paint conditions, you may want more product on the surface working for you. Here`s an example of dime size drops of product.
Dime size drops of product


Ample
You want an AMPLE amount of product when first starting out because you pad is dry and some of the product is going to seep into the pad leaving less on the surface to LUBRICATE and ABRADE the paint
Cut down on the amount of product AFTER pad is broken-in...
After your pad is broken in with product, clean your pad after each section pass and when you apply fresh product you can cut down on the amount of product you actually apply to the face of your pad.
Too Little Product
Under-using product reduces lubricity and will make it more difficult for your pad to rotate efficiently.
Too Much Product
Using too much product will hyper-lubricate or over-lubricate the pad and will interfere with the abrasives ability to abrade the paint.
Keep in mind that you want enough product on the surface so you have,
- Abrasives working for you.
Often times if you don`t have enough product to work with you`ll end up buffing to a dry buff. When you lose lubrication, friction increase and this can lead to micro-marring or hazing.
- A lubricating film between the paint and the pad.
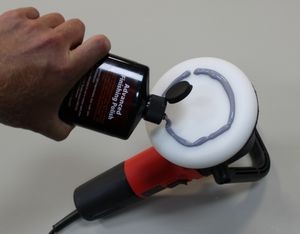
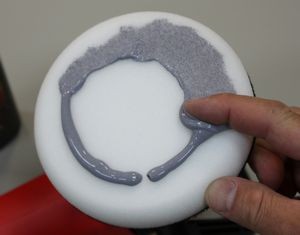
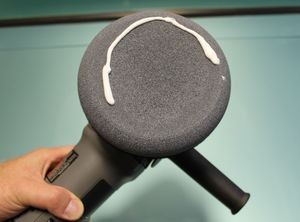
2. Applying a Circle Pattern of Product
Benefits to a Circle Pattern
As you work around the car you`ll find that your product will migrate to the center on it`s own. This can lead to pad saturation starting at the center of the pad where most of the heat is generated.
This can cause problems because wet foam will hold in heat better than dry foam and over time this can accelerate de-lamination between the hook & loop material and either the foam of the pad or the backing material on the backing plate.
Knowing this... I don`t help the problem by using an X pattern as using an X-pattern means putting product onto the middle of the face of the pad.
If you`re placing pea or dime sized amounts of product to the face of your pad then it`s also a good idea to avoid placing the product directly in the center of the pad.
Circle Pattern on a clean dry pad and then worked for a Section Pass

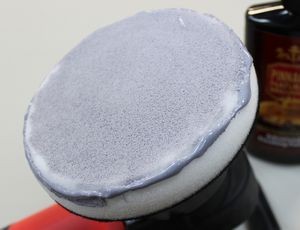
After working the circle of product over a section, you can see it spread the product out over the entire face of the pad without having to spread it with your finger.
The pad is now equally primed with residual product. At this point you could clean your pad or add fresh product and when you add fresh product you can adjust how much product you apply. In this example I used half a circle of product since the pad is now primed with previous product.

X-Pattern on a clean dry pad and then worked for a Section Pass
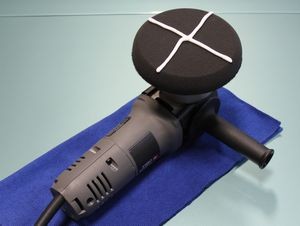
After making a thorough Section Pass. The pad is now equally primed with residual product. At this point you could clean your pad or add fresh product and when you add fresh product you can adjust how much product you apply. In this example I used half an X-Pattern, or a single strip of product since the pad is already primed.


Wet film on the surface
The key is to have enough product on the surface as you`re working a section to have a wet film of product that you can see on the surface behind the polisher as you move the polisher over the paint.
Pad Conditioners
Another option is to use a product called a Pad Conditioner to lubricate and condition the surface of a dry pad. This will improve the buffing cycle and provide protection to the paint surface to help prevent micro-marring during the initial break in of a dry pad. This will also make cutting pads which are usually very stiff and aggressive when dry more pliable to conform to the contours of body panels.

Results 1 to 1 of 1
-
04-27-2011, 04:43 PM #1Administrator


- Join Date
- Aug 2003
- Location
- Stuart, Florida
- Posts
- 332
- Post Thanks / Like

How to prime your buffing pads - How much product to use?
Mike Phillips
Host - Competition Ready on Velocity Channel
Director of Training Autogeek & Marine 31
Competition Ready Facebook Page
Mike Phillips Facebook Page
Twitter
Instagram
Click on a book to get your own copy.


 Reply With Quote
Thread Information
Users Browsing this Thread
There are currently 1 users browsing this thread. (0 members and 1 guests)
Similar Threads
-
HD Products are going Prime Time. Free Shipping with Amazon Prime
By Ben@3D in forum 3D / High Definition Car CareReplies: 7Last Post: 07-25-2014, 10:36 AM -
should i prime surbuf pads?
By jeffny09 in forum Polishing with a DA PolisherReplies: 8Last Post: 08-06-2012, 09:27 PM -
FS: Jeff Werkstatt - Prime, Prime Strong and Acrylic Jett Trigger
By BMW335i in forum Good DealsReplies: 0Last Post: 03-15-2011, 04:57 PM -
Prime Strong in conjunction with pads...
By danforz in forum Car Detailing Product DiscussionReplies: 2Last Post: 01-30-2007, 01:15 PM -
JW Prime vs. Prime Acrylic vs. Prime Strong
By Bioman in forum Car Detailing Product DiscussionReplies: 19Last Post: 04-25-2006, 03:33 PM
Bookmarks