Review: CarPro PERL
Introduction:
PERL stands for Plastic, Engine Rubber, Leather. When PERL was introduced some months ago (before AG picked this line up there was a lot of excitement from people. As you all know I’ve been a big fan of Ultima Trim and Interior sealants for a long time and I’m always skeptical that a product can stand up to the durability of UTTG (or ETS for that matter now). I questioned how could PERL do something for trim that UTTG does not. CarPro improved its formula between then and now by introducing a higher concentration of one of their chief active ingredients. Will that translate into excellent durability? We will soon see.
Product Claims:
PERL Coat by CarPro is a water-based, protective coating for plastics, rubber, and leather. PERL Coat restores the like-new appearance of these surfaces and keeps them looking good with strong UV and hydrophobic protection. Best of all, PERL Coat lasts up to three months!
Details:
1.- Packaging: Plastic bottle with durable plastic plug and threaded cap
2.- Directions: Clearly labeled
3.- Viscosity: Thick (Before Diluting)
4.- Color: White
5.- Scent: Faint - So familiar but I can’t place it (Meant to be apple)
6.- Regular Price: 1.7 oz. (50ml) = $ 4.99
7.- Regular Price: 16.9 oz. (500ml) = $15.99
8.- Regular Price: 33.8 oz. (1000ml) = $24.99
9.- Manufacturer: CarPro
10.- Made in: Korea
Recommended Dilutions:
1.- Tires/Rubber – Undiluted~1:1
2.- Engine - 1:1 ~1:3
3.- External Plastics - 1:3
4.- Interior Vinyl & Leather – 1:5
Product used for application:
Micro Fiber Towel or foam applicator depending on surface and goals
Product
Average Conditions (Fahrenheit)
Average Conditions (Celsius)
PART 1: Tires
As we all know a tire dressing can have different affects on different tires so I will show the product on 4 different types of tires and applied in various manners but first things first.
Video: Preparation of Tire
[ame=http://www.youtube.com/watch?v=4LYGz7EgPX4]Wash Tire.wmv - YouTube[/ame]
I begin by washing tires with ARO and a nylon brush twice and rinsing each time. During the final rinse an mf towel is used as well. The tire is then either left to dry or forced dry with the Metro Master Blaster.
Tire Application:
Video: Application of PERL to tires straight or 1:1
[ame=http://www.youtube.com/watch?v=hVhm8gnTjp0]PERL.wmv - YouTube[/ame]
Adams Bike (After)
Vehicle 2:
After Washing and Drying / Before Dressing
After
50/50
Vehicle 3:
Before Washing
During Wash #1
During Wash #2
Products used on the next Tire
After (PERL 1:1 / UTTG / PERL)
Tire Observations:
I have applied the product to a few vehicles over the last few weeks. I have to say I think the look this product provides on tires is gorgeous. I’ve applied using both 1:1 dilution and no dilution. Obviously we would assume no dilution would offer more durability but that may not be the case. One of our durability tests will prove this theory one way, or the other. I really enjoy applying the product 1:1. Using my 1:1 mix bottle I spray it directly on the tire and then with a few quick swipes the tire is dressed.
After doing a few cars with the product I checked on a couple of them. Adam told me his bike tires were still looking good after about 3 weeks. It is garage kept and I’m not sure how much rain it has seen. I checked another vehicle (that sits outside 24/7) a couple weeks later and found the durability was not what I had hoped for when exposed to rain. The product was definitely still there and was beading but the look had dropped off. I asked Avi about this and he suggested I layer thin coats to achieve a longer durability in the looks department.
Applied 1:1 it’s so quick and easy that layering time doesn’t particularly concern me. The correct way to layer is to apply a thin coat and allow PERL to dry while you continue with other tasks. After approximately 30 minutes or when the product is dry you come back and apply an additional thin coat. This can be repeated and in my next test I will apply 1, 2, and 3 layers to test the differences over time. I think in the real world 3 coats would be asking too much for most cars unless it produces phenomenal durability. We will see…
So, our durability test will show a few things:
UTTG vs. PERL side by side
PERL 1:1 vs. PERL
PERL 1:1 with 1, 2, & 3 layers
Video: Ultima Trim & Tire Guard vs. CarPro PERL
First the tire was washed as described previously. While rinsing it the final time I also scrubbed it with an mf towel.
[ame=http://www.youtube.com/watch?v=aSyy-DyrJtQ]Pearl Vs Ultima Tire.wmv - YouTube[/ame]
Surface Temperature
Products & Applicators
UTTG vs. PERL 1:1 (2 layers each)
PERL 1:1 (2 layers vs. 3 layers) LOOK AT THAT!
PERL 1:1 (3 layers vs. 1 layer)
PERL 1:1 (1 layer) vs. UTTG
As you can see the tire gets noticeable darker with additional layers of PERL and it looks great! As I was applying the UTTG to its section I found the homemade HT applicator didn’t work so hot. The UTTG soaked into the applicator way too fast but the HT material worked excellent for application of PERL. You can see in the macro pictures my UTTG section was not as nicely coated as I had thought. This is due to the applicator and I’ll switch back to my typical UTTG applicator in the future.
Results 1 to 15 of 34
Thread: Review: CarPro PERL
-
08-29-2011, 07:44 PM #1
Review: CarPro PERL
-
08-29-2011, 07:45 PM #2
Re: Review: CarPro PERL
PART 2: Exterior Plastic Trim
PERL was also applied to plastic trim of 2 vehicles. For plastic trim it is recommended to dilute between 1:1 and 1:3. I found it to apply extremely easily when applied 1:1 or 1:3 and to leave a nice matte finish. It can be layered on exterior trim as well. With this type of surface you can spray on and then wipe off with a Microfiber towel or apply with foam and leave as is or lightly wipe with mf towel. I recommend spraying it on and wiping it off.
I went against the grain on one test and actually applied it un-diluted with a foam applicator. This produced a higher gloss level that looked very “plastic” in contrast to the nice matte finish that is discovered when applying it properly.
Note in the photos below the different dilutions and methods of application.
Before

After (No dilution – Applied with foam Applicator – Not buffed)

50/50 (Artificial Tape Line)

A few days later (after a storm)


Before

After (No dilution – Applied with foam Applicator – Not buffed)

Cowl 50/50 (1:1 – Sprayed on & wiped off) Artificial Tape Line shown

Cowl 50/50 (Artificial Tape Line)

Cowl After 50 (1:1 – Sprayed on & wiped off) Image lighting modified to remove flash washout

Window Seals:
One of the vehicles I was working on had some seriously nasty window seals. After attempting to clean them with rubber cleaner and a toothbrush I moved on to using water spot remover. This was able to clean them much better but the rot was too deep for me to be satisfied. I used my Flex 3401 armed with Duragloss Nano Polish and a tangerine HT pad to polish these seals before moving forward.
Before

Before

Uh Oh! It wasn’t a bird that did that! I spilled some of my polish but after cleaning up the mess and under the seal I moved forward.
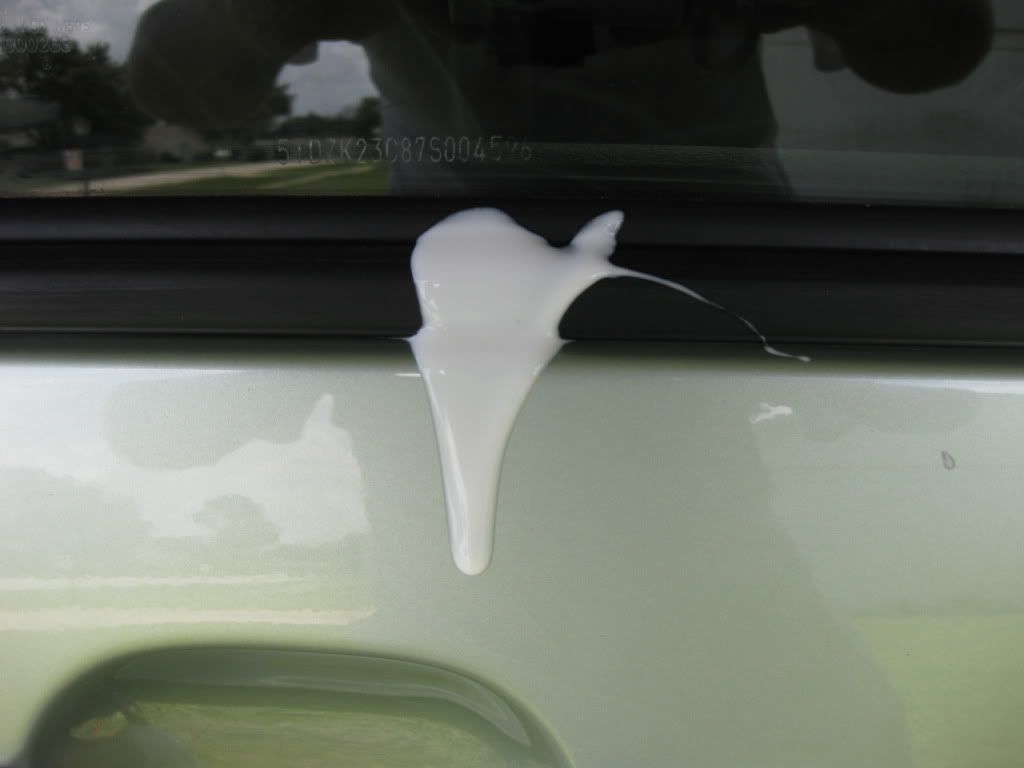
After I finished polishing and cleaning the seals I applied Cquartz to them. After buffing them 30 minutes later I moved on to other things and came back later to coat them with PERL (neat)


PART 3: INTERIOR
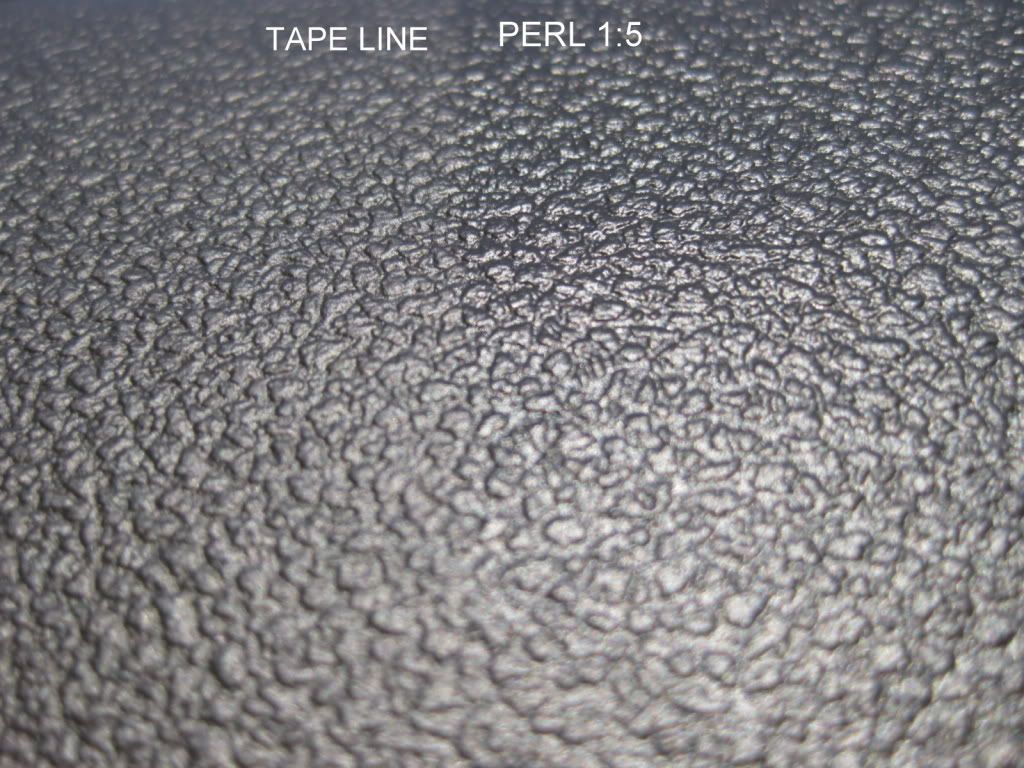
On interior surfaces I really didn’t know what to expect from PERL. For a comparison I applied PERL and UIGP side by side on some of the surfaces in my Sky including finished leather and also vinyl.
On interior surfaces you can spray on and then wipe off with a Microfiber towel or apply with foam and lightly wipe with an mf towel. I found spraying on and wiping off to be simple and effective.
Video: Application
[ame=http://www.youtube.com/watch?v=7luAhlmVhi0]Pearl Vs Ultima Interior.wmv - YouTube[/ame]
I didn’t expect the surface to feel as dry to the touch as it did but was happily surprised. Next to UIGP it is darker which I like. It’s less glossy than 303 AP but a hint more so than UIGP. I still need to get it out in the sun to see it in full light. Unfortunately the lighting in the garage forced me to use artificial lighting. The lighting and flash made the pictures turn out much different then the way the surfaces actually look in person where both products are much more flattering than shown here.
Products Used

Leather Seat

Leather Seat

Door Panel

Door Panel

Hyrophobic

PART 4: ENGINE
Well, I hope you guys are still with me so I’ll speed through this last section. What you see below got a quick once over with Eco Touch APC and was then dressed with PERL 1:1.
Before

After

Pros:
1.- Application: Very easy (Spray on, wipe off gently)
2.- Appearance: Darkens the surface to a satin finish
3.- Versatility: Use on exterior trim and tires, interior vinyl and leather, and under the engine bay
4.- Dry: (Non-greasy) finish that doesn’t leave spots and lines on the trim when it rains
5.- No lingering scent on interiors
6.- Price: After diluting you really get a lot of product for the price
???:
1.- What will the durability be?
2.- Strong UV Protection (this was not added to pros because I did not test and prove it here
Cons:
1.-Multiple layers may be needed for strong durability in rainy conditions (To be continued)
Final Observations and Summary:
PERL is a jack-of-all-trades, a master of at least one, and a strong competitor with the rest. To me this product makes 303 Aerospace Protectant feel rather dated. You can use 303 AP on all the same surfaces that PERL can be applied to but its an entirely different product that is less greasy than 303 and it comes in a concentrate that can be diluted at different levels for the desired surface. Another important point is it is easier to apply than 303AP. In most cases it is spray on wipe off where as with 303AP you must apply a bit more effort wit your towel to tame the shine and receive the finish you want.
PERL is darker than UTTG and restores faded trim better initially. I never expect anything to hold up to UTTG in the durability department but I am excited to find out if layering gives me decent durability. But what do I know? I told Avi I didn’t expect it could hold up to UTTG and he welcomed me to pit one against the other. It should be exciting to see. On most trim I prefer UTTG at this time but on faded trim I’m thinking PERL will accept the position.
On tires I really like the look of PERL and I love, love, love the look when it’s layered. I’ve never seen anything so black and the best part is its jet black AND dry to the touch without too much gloss or any kind of greasy look. From here on Skybaby will be getting 3 layers of PERL on her tires. This will be her go to tire dressing.
As far as interior performance I really like the look and ease of application but the UIGP still has that tactile feel that I love and can also be used on fabrics. There are 2 products in my favorites for use on finished leather but I now have a third. L1 is just a pinch darker than UIGP but it fails miserably in the hydrophobic dept next to UIGP. PERL on the other hand is darker than both L1 and UIGP but it doesn’t quite have the tactile feel of UIGP although I do like it. As far as the hydrophobic properties of PERL at 1:5 it is equal to beading and resistance UIGP gives and a good deal better than L1. On many vehicles PERL will become my go to interior dressing but on my Sky I think I will still use UIGP. I may switch back and forth on this.
Bottom line is I welcome someone to name a product that (on interior and exterior) applies this easily, looks this good, and feels this dry to the touch, while still achieving the prices that PERL offers. After dilution this product is an excellent value in my estimation.
Thank you for taking the time to read this review! Cheers
I have to post this picture one more time… I just love that look on the right.

-
08-29-2011, 08:16 PM #3
Re: Review: CarPro PERL
Great review Dog! I won`t lie that i do like the look of Perl quite a bit. As I`ve told you in our chats, I can`t get over that the first time I used it, it didn`t even last overnight through one light rain. Granted I only did one coat, but it was straight. Hopefully that has been improved with this new formula. Again, great review!
-
08-29-2011, 08:53 PM #4
Re: Review: CarPro PERL
Great review! Very thorough. I personally do not like shinny leather in the least though (just my opinion). Also what is the dust attraction on the leather vs. Ultima vs. untreated?
-
08-29-2011, 10:27 PM #5
Re: Review: CarPro PERL
Thanks Corey for sharing your reveiw with us ! Also interested hiow it hold up in rain...please keep us posted !
 Prayer of St.Francis
http://www.youtube.com/watch?v=69ni2...endscreen&NR=1
-
08-30-2011, 05:08 AM #6
Re: Review: CarPro PERL
Another Great review Corey... If the durability is there this would be a great product to get as you can use it on so many areas.
-
08-30-2011, 07:32 AM #7
Re: Review: CarPro PERL
Great review Corey. I wasn`t too impressed with PERL on tires but I did like it on the interior. I didn`t find that the durability was all that great on tires. I am going to follow your advice and try multiple coats and layering and see if that improves things.
Only Z Best Detailing-Automotive Concours Detailing Services
http://ozbdetailing.com
https://www.facebook.com/ozbautodetailing
-
08-30-2011, 08:04 AM #8
Re: Review: CarPro PERL
Thanks a lot guys!
Durability is definitely what I`m looking forward to testing.
Todd, I don`t like shiny leather either. Like I mentioned the lighting was bad in the garage (my fault) allthough I did try various lighting I couldn`t pull the Sky out into the light because of the operation I had going on in the driveway. The picture looks much glossier than the product is in person due to the flash. Even the UIGP looks shiny in that picture and we know it isn`t. Shame on me. I`ll pull the car out into the light asap and get a fresh picture.
Dave, yes I remember you mentioning that. I too love the look on tires... Especially 3 coats!

Sky only gets wet during her bath so she is definitely getting PERL from now on. I`m hoping for good durability with these multiple layers and if they are at least 2 weeks I will switch to PERL for all tires probably.
Thanks DC, will do!
Thank you Troy! I agree
Thanks Pat, wait till you see 3 layers on tires
Lets just cross the fingers and hope that holds up! I`m hoping for thunderstorms today so we can get an update.
-
08-30-2011, 09:56 AM #9
Re: Review: CarPro PERL
I think it looks more uniform and even on the tires than UTTG. I hope it holds up well because I would like to try it on some faded finder well plastic
-
08-30-2011, 10:52 AM #10
Re: Review: CarPro PERL
Can`t wait. I am down the beach on vacation and brought PERL with me. I plan on doing some detailing so I am going to see what 3 coats looks like.Thanks Pat, wait till you see 3 layers on tires Only Z Best Detailing-Automotive Concours Detailing Services
http://ozbdetailing.com
https://www.facebook.com/ozbautodetailing
-
09-03-2011, 10:16 AM #11
Re: Review: CarPro PERL
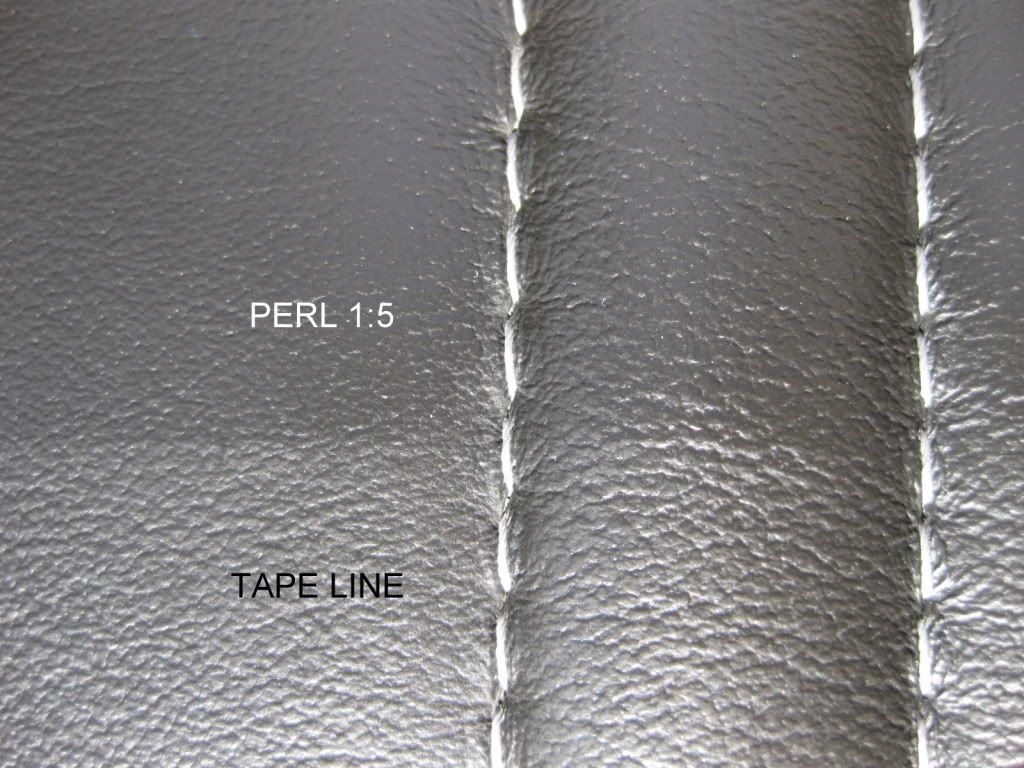
Interior photos update:
Well, just went for my morning drive and took some good photos of the interior while I was out in the sun.
Leather Seat (In Sunlight)
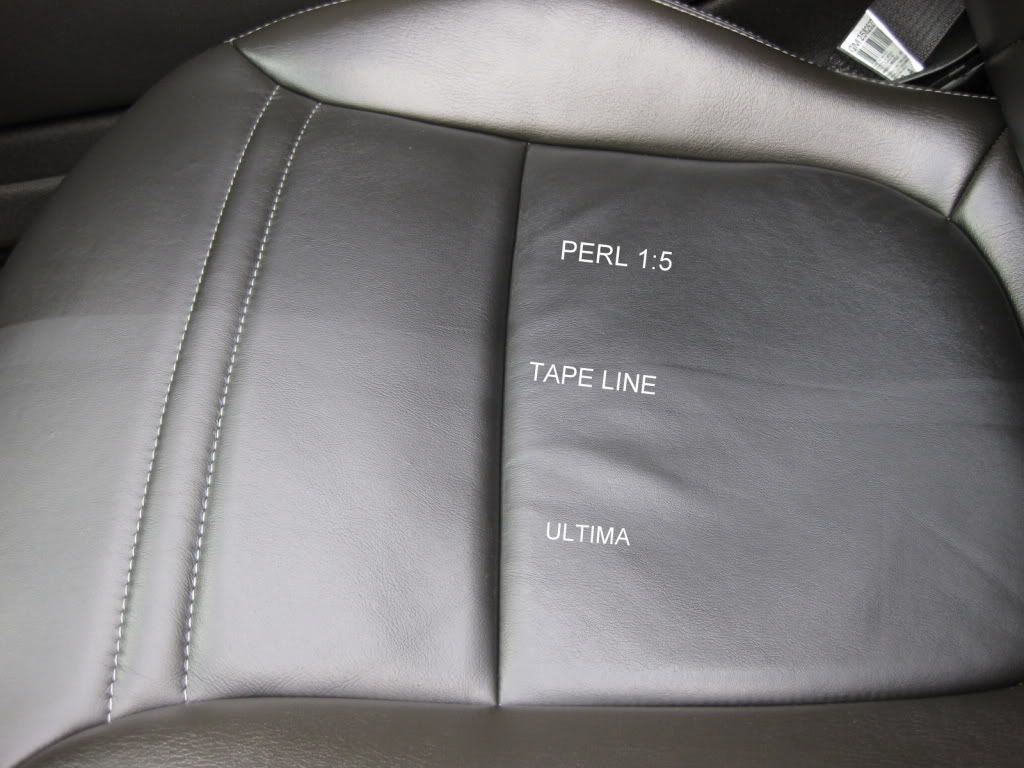
Leather Seat (In Sunlight)
Door Panel
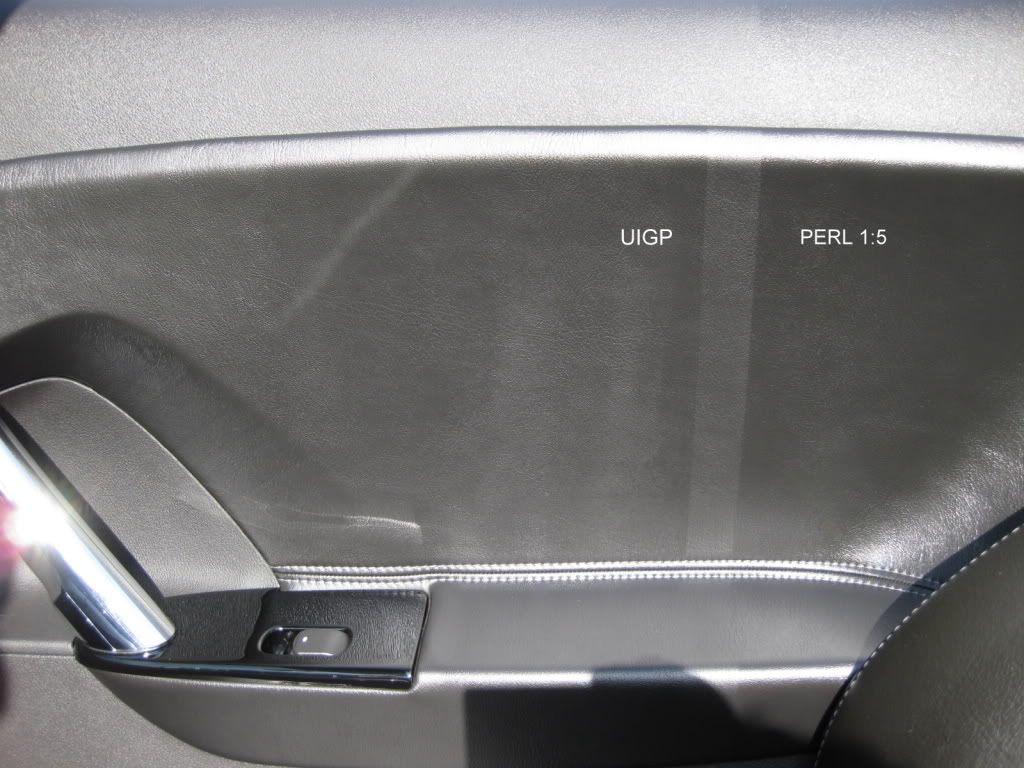
Door Panel
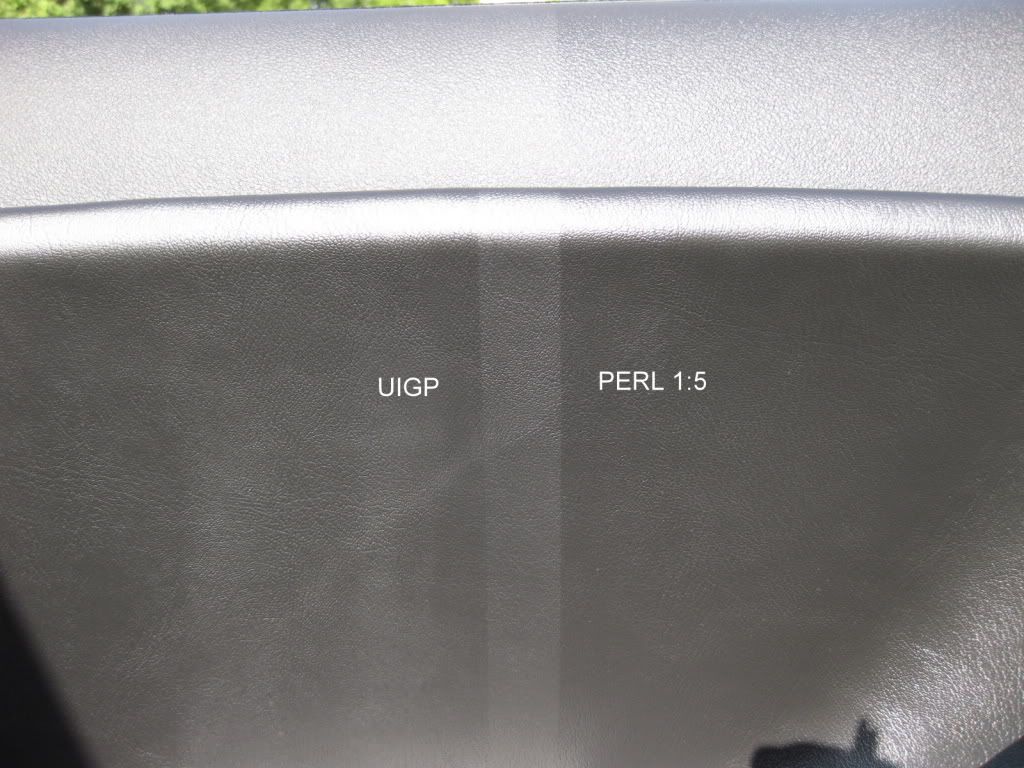
Door Panel

Door Panel (Upper area)
-
09-03-2011, 10:59 AM #12
Re: Review: CarPro PERL
As soon as I do my next full intense wash, I`m going to have this product on hand to finally try out and when I do my next interior dressing, I`m going to switch from 303--that`s a first in over 8 years! I`m pretty excited about this PERL!
Treat it like it`s the only one in the world.
-
09-03-2011, 11:21 AM #13
Re: Review: CarPro PERL
PERL 1:1 Tire Update
The day after application the product began being tested for durability on tires.
It rained 3 days this week and on two of those days it rained a lot. On one of those days there would be a rainstorm and then just enough time for it to dry before another storm would come through. So it saw at a couple hours of rain the first day and then was driven with the roads still wet for approximately 20 miles.
All PERL was applied 1:1 See titles for qty. of layers per picture
Vehicle kept outside 24-7
Day 1 – Hot & humid with no rain
Day 2 - Total miles: 40 – Rainy
This is the parking lot it was sitting in at work just before I left after the first of the rainy days.

And after I got home I snapped a couple pictures.
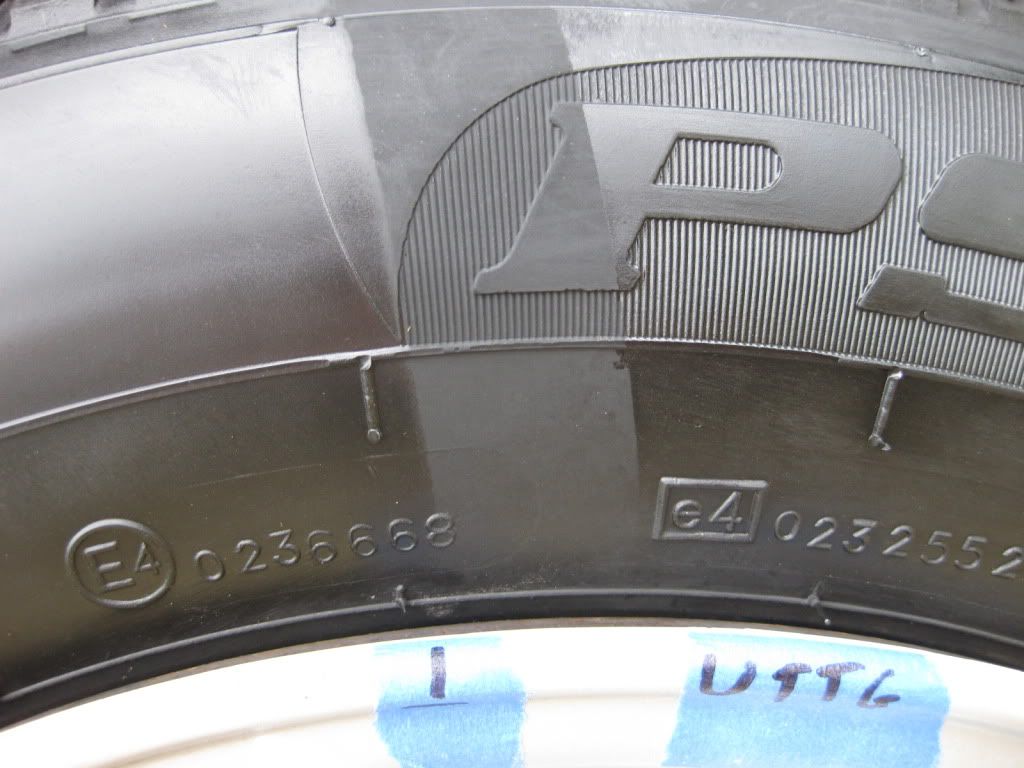

Day 3 - Total miles: 40 – Rainy
Day 4 - Total miles: 40 – (1) Shower
Day 5 – Hot & humid with no rain
Day 6 – Hot & humid with no rain
Here is the tire after 1 week
TOTAL MILES: 200
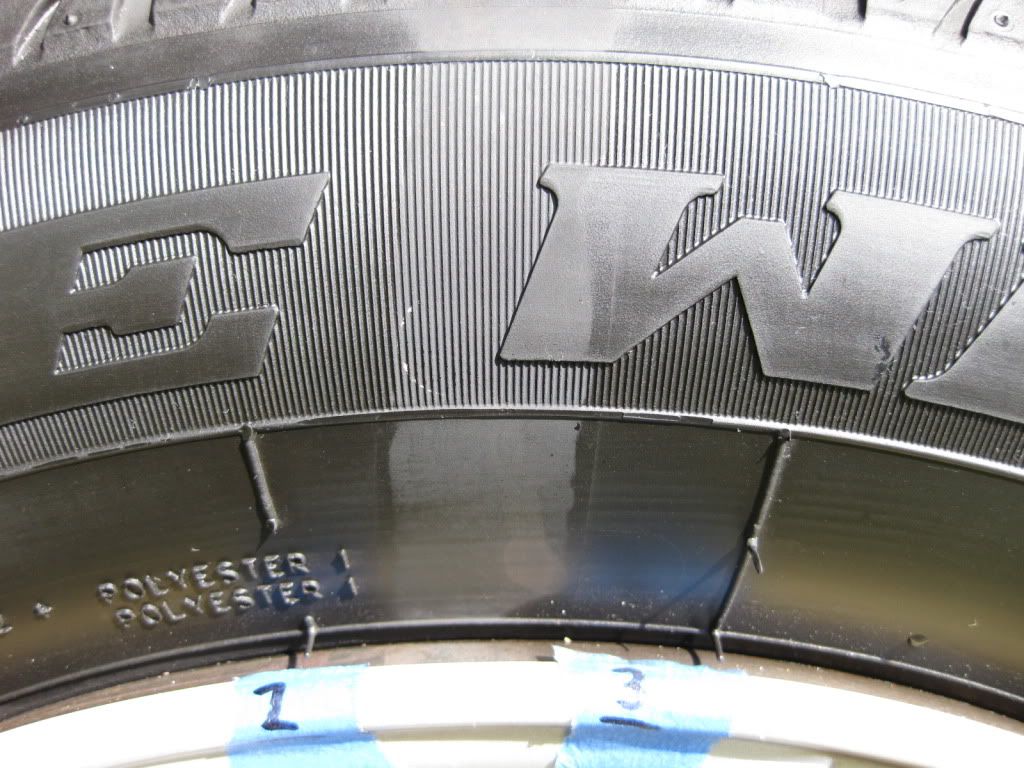
3 layers
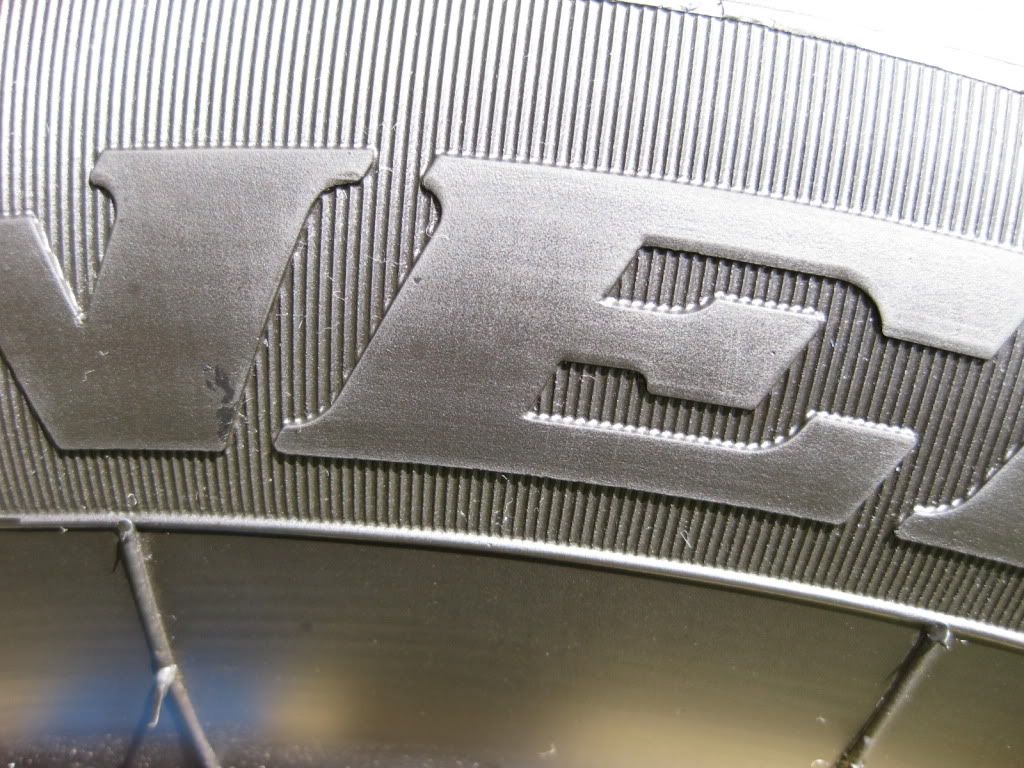
3 layers
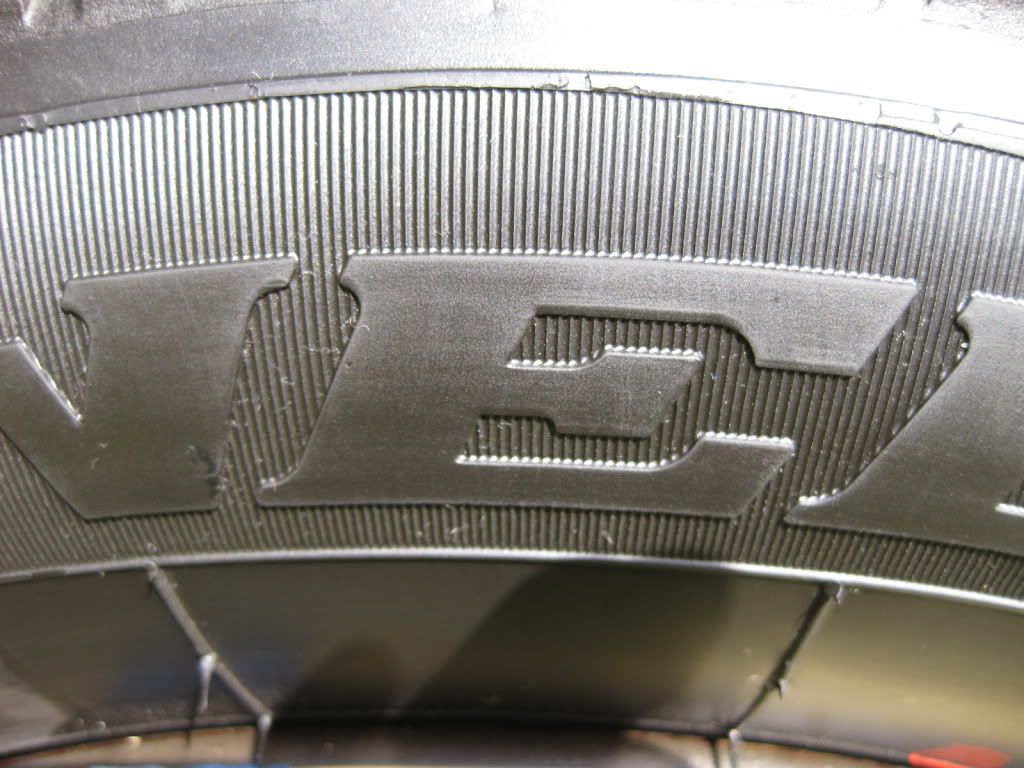
3 layers

2 layers

1 layer

PERL 1:1
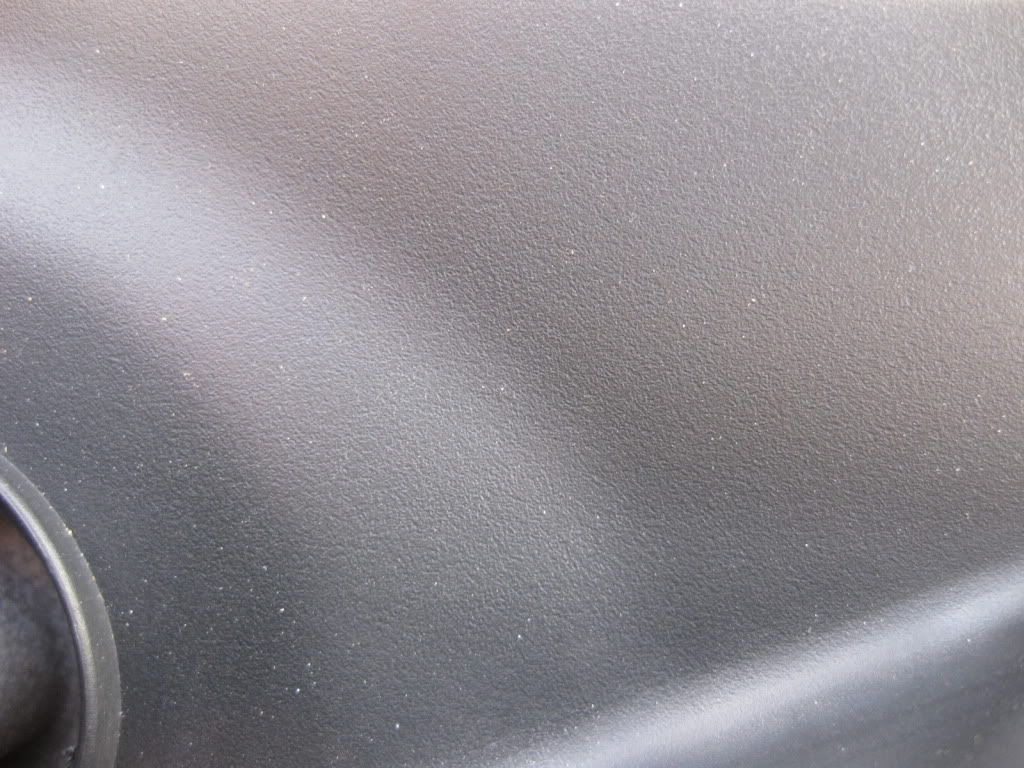
Trim Update – 2 WEEK UPDATE
Applied to cowl (2 weeks ago) 1:1 with NO layering it’s still looking good.
-
09-03-2011, 08:20 PM #14
Re: Review: CarPro PERL
Thanks for the update Corey... So far so good.
-
09-03-2011, 10:00 PM #15
Re: Review: CarPro PERL
Great update! Glad to see it seems to be holding up on the tires fairly well. Although I can say I really don`t care for how much shine it adds to the leather, but that is just my opinion.
Thread Information
Users Browsing this Thread
There are currently 1 users browsing this thread. (0 members and 1 guests)
Similar Threads
-
CarPro PERL how do YOU apply it?
By EVOlved in forum Tire, Wheel, Chassis and Engine DetailingReplies: 8Last Post: 08-05-2014, 09:25 AM -
Review - CarPro PERL
By Wors in forum Detailing Product ReviewsReplies: 11Last Post: 06-23-2014, 11:33 AM -
Review: CarPro PERL
By CEE DOG in forum Car Detailing Product DiscussionReplies: 35Last Post: 10-20-2012, 06:46 PM -
Is silicon in Carpro PERL a bad thing?
By ihaveacamaro in forum Auto Detailing 101Replies: 7Last Post: 10-19-2012, 02:46 PM


 Reply With Quote
Bookmarks