

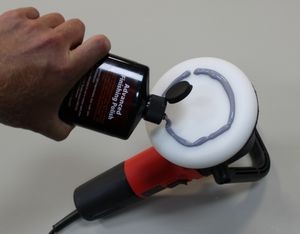
How to maximize the ability of your DA Polisher for show car results!
I originally wrote this to help the hundreds of thousands of people that own first generation Porter Cable DA Polishers get the best use out of their tool when it comes to removing swirls, scratches and water spots out of modern factory baked-on clear coat paints.
Truth is...
The below tips will help you get the best results out of ANY DA style polisher including,
- Griot`s Garage 6" Random Orbital Polisher
- PC7424XP
- PC 7336
- PC 7424
- Shurhold DA Polisher
- DAS-6 PRO Dual Action Polisher
- Meguiar`s G100
- Meguiar`s G110
- Meguiar`s G110v2
- Meguiar`s G220
So no matter which make and model of DA Polisher you own, the tips shared in this article will help you to get the best use out of your DA Polisher.
The first generation Porter Cable units were sold for a time span of over 25 years, which means there are a millions of these tools in shops and garages across the world, then here`s how to maximize their ability,
--> Use thin, small diameter buffing pads <--
First the reason for this article. The reason for this article is because the problem with these types of tools, that is tools that use a Free Floating Spindle Assembly, is that they have a hard time keeping foam buffing pads rotating under pressure.
It is even more difficult for these first generation PC units to keep a foam pad rotating under pressure as the pads become wet with product. The reason for this is because the wet foam acts to absorb and dissipate the power supplied via the Free Floating Spindle Assemble and the result is the pad will stop rotating and simply vibrate or jiggle against the paint.
Now here`s why this is a problem...
Most people that get into machine polishing are doing so because they, like millions of other people, have discovered that removing below surface defects out of clear coat finishes is difficult and time consuming to do by hand. For more information on why it`s hard to remove swirls, scratches and water spots out of clear coat paints by hand read these two articles,
Primarily due to the ability of "Discussion Forums" to disseminate information to large demographic and targeted groups of people, over the last 10 years more and more people have learned about the Porter Cable Dual Action Polisher and moved up from working by hand to working with an electric polisher.
Now this is key...
There are 4 primary things you can do with a Porter Cable Dual Action Polisher or similar knock-offs of this tool...
Correction Work - Removing swirls, scratches and water spots or etchings.
Polishing Work - Polishing the paint to a higher level of gloss and clarity after the correction step.
Waxing by Machine - Applying either a wax or a paint sealant by machine because it`s faster and the machine is superior as compared to working by hand and working by hand is actually your 4 fingers pushing down on a wax pad.
Removing Wax by Machine - Not everyone goes this far but some people do prefer to remove dried wax or paint sealant by machine.
Now follow me on this... for the first two procedures, that is Correction Work, (removing defects), and Polishing Work, (that is refining the results of the correction step and maximizing clarity and gloss), you need the tool to maintain pad rotation while downward pressure is applied to the head of the tool.
Here`s why this is important...
The way you remove swirls, scratches and etchings like water spots, also called "Below Surface Defects", is to remove the paint surrounding these types of defects until the highest points of the surface are level with the lowest points of the defects you`re trying to remove.
In other words, the way you remove below surface defects is to abrade the paint until it is flat or level.
Paint is removed best, or if you like the fluffy way of saying this, swirls, scratches and water spots are removed best, when the face of the buffing pad is rotating over the surface, not just jiggling or vibrating.
When it comes to applying a wax or paint sealant, it`s not important because at this stage of the game you`re not trying to remove paint, (remove defects), you`re just trying to spread-out a layer of wax or paint sealant and work it into the paint to whatever level is possible and jiggling or vibrating is perfect for this step.
Then if you want to remove dried wax or paint sealant by machine, then you do want the pad rotating again as that is how a microfiber bonnet around a buffing pad works best for removing a thin film of dried wax or paint sealant.
Back to the problem...
The first generation Porter Cable Dual Action Polishers are not very effective at keeping a pad rotating under pressure, especially pads that are thick and larger.
Thick foam acts to absorber and dissipate the power from the tool and we see this as no or reduced pad rotation. When a pad is dry, it rotates best, at least best to whatever its ability is for the size pad. As you work around a car and continually add more product to work over the paint, some of this product or liquid penetrates into the foam and the combination of foam and liquid acts to absorb the power even more than just dry foam alone.
Large foam pads mean more surface area in contact with the paint and the more surface area in contact with the paint the more power is necessary to rotating the face of the pad over the paint.
When everything is working against you, that is when the pad is large, the pad is thick and the pad is wet or saturated with product, the end results is very slow pad rotation and even no pad rotation.
How to maximize pad rotation for the correction and polishing step for ALL DA Polishers
In a nutshell...
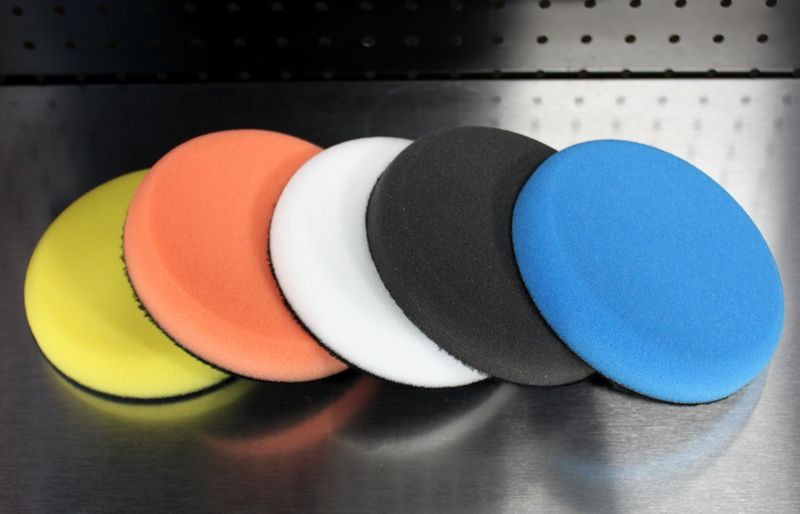
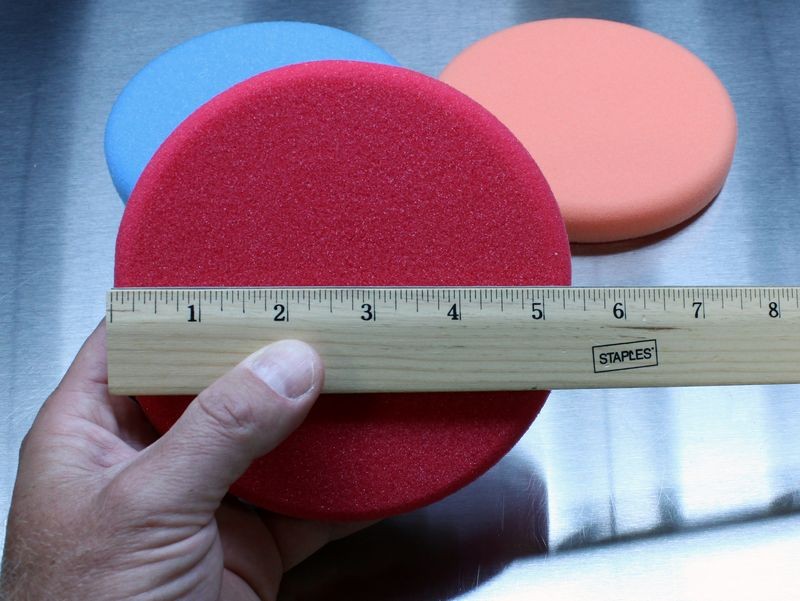
- Small Diameter Pads - 5.5" diameter pads are the best balance of size and effectiveness.
- Thin Pads - The thinner the pad, the less foam there is to absorb and dissipate energy.
- Clean Dry Pads - Being able to switch to a clean, dry pad maintains tool efficiency for maximum pad rotation.
In detail...
Small Diameter Pads - 5.5" diameter pads are the best balance of size and effectiveness.
This is not a recommendation in concrete, just a good general size recommendation because pad thickness and type are HUGE factors. For example, there are other pads for buffing besides the traditional foam buffing pads. One example is the Surbuf MicroFinger Buffing Pads which are very thin and for this reason you can maintain pad rotating fairly well with a 7" pad on a 1st Generation PC.
Generally speaking however, the 5.5" diameter pad is a good balance between too large and too small. It`s true that a 1st Generation PC can easily maintain pad rotation with 4" diameter Spot Repair Pads but this is to small of a size to realistically buff out all the major panels of the average vehicle in a timely manner.
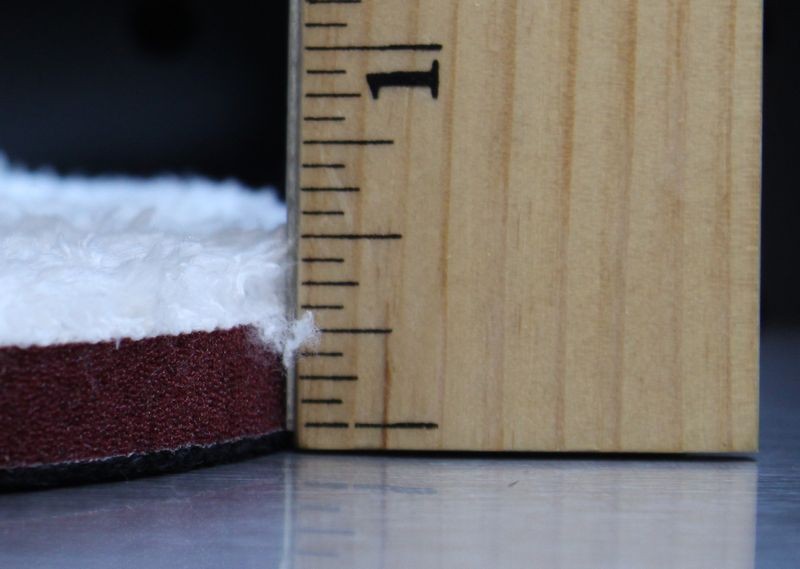
Thin Pads - The thinner the pad, the less foam there is to absorb and dissipate energy.
The thicker the foam the more the cushion and this might be good for a bed, or a couch or a chair, but when trying to maintain pad rotation with a tool that uses a Free Rotating Spindle Assembly, it`s a negative feature.
"Thin is in..."
(Yes, you can quote me on that)
You don`t want the pad too thin or there will not be enough material to conform to the shapes and contours common to the panels that make up a vehicle. For a really thin pad, you can use an Interface Pad which becomes the cushion for the thin pad and provides the safety margin needed for machine polishing delicate clear coat finishes.
Clean Dry Pads - Being able to switch to a clean, dry pad maintains tool efficiency for maximum pad rotation.
In a perfect world anyone buffing out an entire car would have a collection of clean, dry pads available for their project and after buffing out a single panel, remove the used pad and switch to a clean, dry pad. A clean, dry pad can be a new pad or a used pad, but it`s important that it`s clean and dry.
Switching to a new pad for each panel of a car also prevents accidental swirls and scratches should a pad become contaminated from the previous panel. For large panels like the hood or roof of larger cars, trucks and s.u.v.`s, this it`s completely acceptable and beneficial to use more than one pad per panel. Divide the panel into two sections and use a separate pad for each section of the panel.
Panel = A single door, hood, fender, etc.
Section - A portion of a panel
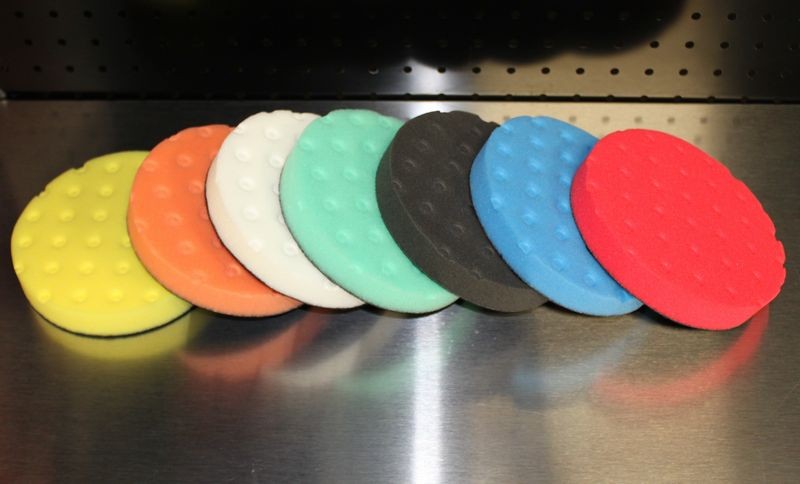
Here are my recommendations for 5.5" pads for ALL Dual Action Polishers.
Lake Country 5.5" Flat Pads
The outer edge of the face of these pads is tapered so they are actually a little under 5" in diameter
Approximately 7/8" thick
Lake Country 5.5" CCS Pads
5.5" CCS Pad is right at 5.5" in diameter

Approximately 7/8" thick
5.5" Hydro-Tech Thin Pads
Approximately 7/8" thick
Approximately 5 1/2" thick
Meguiar`s 6" and 5" Microfiber DA Pads technically referred to as
discs
(Note how thin these are by design...)
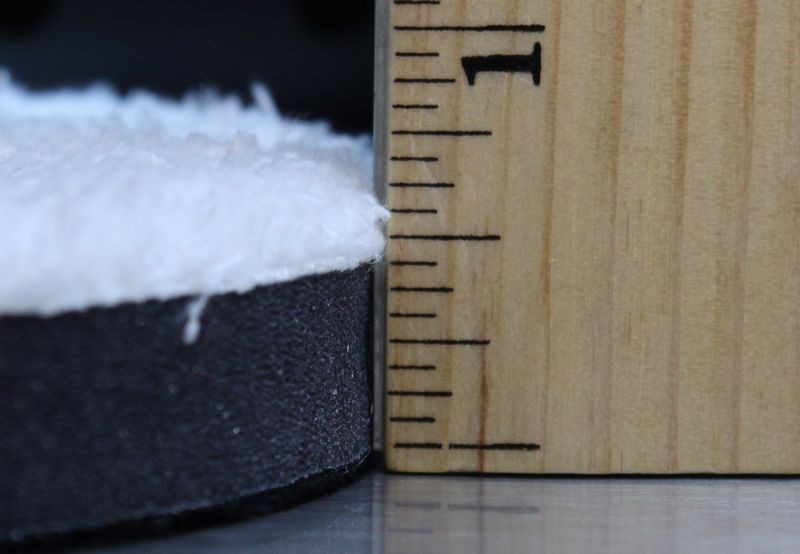
The cutting pad is approximately 1/2" thick before fibers matte down
The polishing pad is approximately 3/4" thick before fibers matte down
The 6" pads are actually about 6 1/4" in diameter
The 5" pads are actually closer to 5 1/2" in diameter
Products shown
5.5" Flat Pads
5.5" CCS Pads
5.5" Hydro-Tech Pads
5" Microfiber DA Cutting Pads
5" Microfiber DA Finishing Discs
6" Microfiber DA Cutting Discs
6" Microfiber DA Finishing Discs
Summary
- To get the best, fastest and most effective correction power out of any dual action polisher, stick with thin, small diameter pads like shown above.
- Use the 5.0 to 6.0 Speed setting for correction work, in most cases you`ll want to be on the 6.0 Speed Setting as this will work best to maintain pad rotation when you apply pressure and when buffing on any type of uneven body panels.
Clean your pad often either with a nylon pad conditioning brush or with a terry cloth towel using the clean your pad on the fly technique
- When the pad becomes wet or saturated with product, switch to a clean, dry pad, this will instantly show up as better rotation ability and that`s what you want when you`re removing swirls, scratches and water spots.
- Mark your backing plate to make it easy to see and maintain pad rotation.
- Keep your pad flat to the surface whenever you can.
- Work a small area at a time - 2` by 2` is too large, shrink your work area downward.
- For correction steps, use firm downward pressure but don`t stop the pad from rotating.
- Use a slow "Arm Speed", that is move the tool slowly over the surface, not quickly.
- Prime new or clean used pads before starting.
- Use an ample amount of product, don`t under-use product and don`t overuse product.
- Work one section at a time by using multiple section passes.
- After you finish one section, move on to a new section but overlap a little into the previous section.
- Wipe off all product residue before moving on to a new section or before re-buffing a section a second, or third time. Don`t mix spent product with fresh product.
- Before starting, do a Test Spot, make sure your choice of pads, products and your proficiency with your technique all work together to get you the results you want and expect before buffing out the rest of the car.

Results 1 to 6 of 6
-
04-13-2011, 10:20 AM #1Administrator


- Join Date
- Aug 2003
- Location
- Stuart, Florida
- Posts
- 332
- Post Thanks / Like

How to maximize the ability of your DA Polisher for show car results!
Mike Phillips
Host - Competition Ready on Velocity Channel
Director of Training Autogeek & Marine 31
Competition Ready Facebook Page
Mike Phillips Facebook Page
Twitter
Instagram
Click on a book to get your own copy.


-
04-27-2011, 12:39 PM #2Administrator
- Join Date
- Aug 2003
- Location
- Stuart, Florida
- Posts
- 332
- Post Thanks / Like
Re: How to maximize the ability of your DA Polisher for show car results!
What is a "Section Pass" and how to do one...
When talking about machine polishing on discussion forums or even in detailing classes, the below questions always comes up,
- What`s a pass?
- How many passes do I make?
- What`s a section pass?
The definition of a pass
There are two definitions of the word pass as it relates to machine polishing with any type of machine.
Single Pass
A single pass is just that. It`s when you move the polisher from one side of the section you`re buffing to the other side of the section you`re buffing. That`s a single pass.
Section Pass
A section pass is when you move the polisher back and forth, or front to back with enough single overlapping passes to cover the entire section one time.
In most cases if you`re removing any substantial below surface defects you`re going to make 6-8 section passes to the section youre working before you either feel comfortable you`ve removed the defects or you`re at the end of the buffing cycle for the product you`re using.
Buffing Cycle
The buffing cycle is the amount of time you are able to work the product before the abrasives have broken down, (if youre using a product that uses diminishing abrasives), and/or the product begins to dry and you lose the lubricating features of the product. Different products have different buffing cycles depending upon the type of abrasives used in the formula and the different ingredients used to suspend the abrasives and provide lubrication.
Factors that affect the buffing cycle include,
- Ambient temperature
- Surface temperature
- Size of work area
- Type of machine
- Type of pad material
- Humidity
- Wind or air flow surrounding the car
- Amount of product used
- Technique
Wet buffing technique
Most compounds and polishes should be used so that there is enough product on the surface to maintain a wet film while the product is being worked. The wetness of the product is lubricating the paint as the abrasives abrade the paint and cushion or buffer the abrading action so the abrasives dont simply scour the finish leaving behind swirls and scratches.
Dry Buffing Technique - Buffing to a dry buff
There are some products on the market where the manufacture recommends buffing the product until it dries. As the product dries youll tend to see some dusting as the product residue becomes a powder and the paint will have a hard, dry shine to it.
Although some manufactures recommend this, its important to understand whats taking place at the surface level as you buff to a dry buff. As the product dries, in essence you are losing the lubricating features of the product and as this happens friction and heat will increase. As friction and heat increases, so does the risk of micro-marring the paint or instilling swirls either by the product residue or the pad material and/or a combination of both.
While we trust that the manufacture knows their products best, when we take a close look at what it means to buff on a delicate surface like an automotive clear coat, it doesnt make sense to run a buffing pad on top of the paint without some kind of wet film to lubricate the paint at the same time. We always recommend that you follow the manufacturer`s recommendations and use your own judgment.
Everyone new to buffing wants to be told some easily identifiable sign that they can use to tell when it`s time to stop buffing and it`s not that simple, so here`s an indicator I`ve always used and taught to others,
Wet film behind your path-of-travel
As you`re making a single pass with the polisher, the paint behind the path of travel of the buffer should have a visible wet film on it. If the paint behind the pad is dry and shiny, you`ve run out of lubrication and you`re dry buffing. Turn the polisher off. Wipe the residue off and inspect using a Swirl Finder Light to make sure you didn`t dull or mar the paint, you usually won`t cause any harm, but pay attention when your running the polisher and don`t buff to a dry buff. If you do, you can quickly re-polish that section by cleaning your pad and adding a little fresh product and making a few new section passes.
UMR
Remember, in most cases the goal is UMR or Uniform Material Removal. The reason for this is so that you remove an equal amount of paint over each section and in turn over the entire car. In order to do this you need a method that you can control and duplicate and for most people following a back and forth, side-to-side pattern works because its easy to remember, easy to do and easy to duplicate.
Mike Phillips
Host - Competition Ready on Velocity Channel
Director of Training Autogeek & Marine 31
Competition Ready Facebook Page
Mike Phillips Facebook Page
Twitter
Instagram
Click on a book to get your own copy.
-
04-27-2011, 12:43 PM #3Administrator
- Join Date
- Aug 2003
- Location
- Stuart, Florida
- Posts
- 332
- Post Thanks / Like
Re: How to maximize the ability of your DA Polisher for show car results!
How to prime your buffing pads - How much product to use?
Use an "ample" amount of product
When I say use an ample amount of product this means dont use too much product and dont use to little product.
From The Free Dictionary.com
Out of the above definitions, I`m using the 3rd definition.am·ple
adjective
1. Of large or great size, amount, extent, or capacity: an ample living room.
2.
a. Large in degree, kind, or quantity: an ample reward.
b. More than enough: ample evidence.
3. Fully sufficient to meet a need or purpose: had ample food for the party.
Using too much productSo you want to use an ample amount of product but this can be different depending upon where you`re at in the process. For example,
If you use too much you can hyper-lubricate the surface and this will make it more difficult for the abrasives to abrade the surface as theyll tend to want to glide or slip over the surface instead of bite into the surface.
Using too little product
If you use too little product there wont be enough lubrication to enable the buffing pad to rotate and thus engage the abrasives against the surface so they can bite into and remove small particles of paint.
- When you`re first starting out and your pad is dry you`ll need to first prime the pad, (that uses product), and then place some product on the face of the pad, this means some more product.
- After the pad is broken in you`ll only need to add fresh product to the face of the pad.
1. Priming the pad then adding product to work with
Priming a clean, dry pad is considered the best approach because it ensures that 100% of the working surface of the pad is wet with product and working at maximum efficiency when you turn the polisher on.
Priming the pad also ensures that you don`t have any dry portion of the pad working over the paint un-lubricated. This really isn`t a risk because since you`re just starting out you`re going to be removing defects a lot more serious than would be caused by any portion of the pad that is dry and spinning against the paint.
Plus, after just a few passes, the product you apply to specific areas of the face of the pad will migrate over the entire face of the pad and it will do this rather quickly when you`re on the higher speed settings.
Priming the Pad - For clean, dry pads
Start with a clean, dry pad and add some fresh product to be spread out to the face of the pad. Using your finger, spread the product out over the pad and then using your finger work it into the pores of the pad. Don`t saturate the pad, just use enough product to make sure that 100% of the working face of the pad has product coverage.
Work the product around the face of the pad and into the pores


Any extra, take and apply to the outer edge until 100% of the working face of the pad is primed with product.

As an option you can also prime the outer edge. This helps if you`re buffing around convex curves or around panels that the edge of your buffing pad may come into contact with, like spoilers, side mirror housings, curved panels etc.
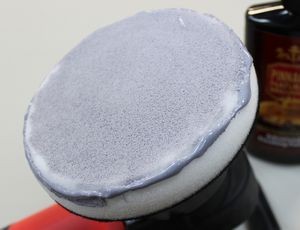

Primed and ready to add "Working Product" to.


Adding "Working Product" to the primed pad
Some people will recommend 3 to 4 pea size drops of product as the proper amount of product to use and this can be correct for concentrated products or working small sections and if you follow this advice make sure you are not under-lubricating the surface being worked.
Pea size drops of product
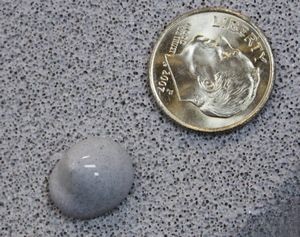
For some products and paint conditions, you may want more product on the surface working for you. Here`s an example of dime size drops of product.
Dime size drops of product


Ample
You want an AMPLE amount of product when first starting out because you pad is dry and some of the product is going to seep into the pad leaving less on the surface to LUBRICATE and ABRADE the paint
Cut down on the amount of product AFTER pad is broken-in...
After your pad is broken in with product, clean your pad after each section pass and when you apply fresh product you can cut down on the amount of product you actually apply to the face of your pad.
Too Little Product
Under-using product reduces lubricity and will make it more difficult for your pad to rotate efficiently.
Too Much Product
Using too much product will hyper-lubricate or over-lubricate the pad and will interfere with the abrasives ability to abrade the paint.
Keep in mind that you want enough product on the surface so you have,
- Abrasives working for you.
- A lubricating film between the paint and the pad.
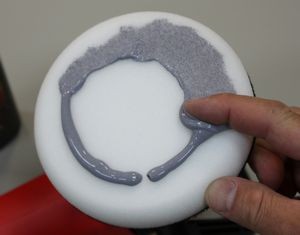
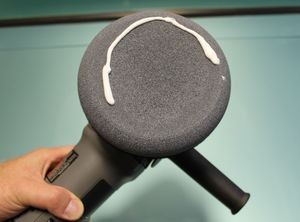
2. Applying a Circle Pattern of Product
Benefits to a Circle Pattern
As you work around the car you`ll find that your product will migrate to the center on it`s own. This can lead to pad saturation starting at the center of the pad where most of the heat is generated.
This can cause problems because wet foam will hold in heat better than dry foam and over time this can accelerate de-lamination between the hook & loop material and either the foam of the pad or the backing material on the backing plate.
Knowing this... I don`t help the problem by using an X pattern as using an X-pattern means putting product onto the middle of the face of the pad.
If you`re placing pea or dime sized amounts of product to the face of your pad then it`s also a good idea to avoid placing the product directly in the center of the pad.
Circle Pattern on a clean dry pad and then worked for a Section Pass


After working the circle of product over a section, you can see it spread the product out over the entire face of the pad without having to spread it with your finger.
The pad is now equally primed with residual product. At this point you could clean your pad or add fresh product and when you add fresh product you can adjust how much product you apply. In this example I used half a circle of product since the pad is now primed with previous product.

X-Pattern on a clean dry pad and then worked for a Section Pass
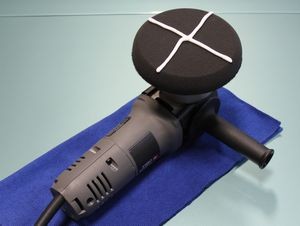
After making a thorough Section Pass. The pad is now equally primed with residual product. At this point you could clean your pad or add fresh product and when you add fresh product you can adjust how much product you apply. In this example I used half an X-Pattern, or a single strip of product since the pad is already primed.


Wet film on the surface
The key is to have enough product on the surface as you`re working a section to have a wet film of product that you can see on the surface behind the polisher as you move the polisher over the paint.

Pad Conditioners
Another option is to use a product called a Pad Conditioner to lubricate and condition the surface of a dry pad. This will improve the buffing cycle and provide protection to the paint surface to help prevent micro-marring during the initial break in of a dry pad. This will also make cutting pads which are usually very stiff and aggressive when dry more pliable to conform to the contours of body panels.
Mike Phillips
Host - Competition Ready on Velocity Channel
Director of Training Autogeek & Marine 31
Competition Ready Facebook Page
Mike Phillips Facebook Page
Twitter
Instagram
Click on a book to get your own copy.
-
04-27-2011, 12:56 PM #4Administrator
- Join Date
- Aug 2003
- Location
- Stuart, Florida
- Posts
- 332
- Post Thanks / Like
Re: How to maximize the ability of your DA Polisher for show car results!
Why it`s important to clean your pads often...
ANYTIME you`re abrading the surface whether you`re using an aggressive cutting compound of an ultra fine polish, you have two things building up on the face of your buffing pad...
- Spent product
- Removed paint
You need to remove both of these substances from the face of the pad and the panel you`re working on before you apply fresh product. If you don`t,
- Adding fresh product to spent product and removed paint adulterates the fresh product, it also dilutes it.
- Buffing with a dirty pad will be more difficult.
- The product will cake-up on the face of the pad.
- The product will become gummy on the paint and hard to wipe off.
How to clean your pads and other options to make buffing clean again...
- You can scrub the face of the pad with a nylon brush like a pad conditioning brush or even a nylon toothbrush
- If using a Dual Action Polisher or a Rotary Buffer you can clean your pad on the fly with a terry cloth towel
- You can wash your pads in a bucket of water
- You can wash your pads in a sink under running water
- You can wash your pads in a pad washer
- You can switch to a clean, dry pad
- You can switch to a brand new pad
That`s the whole idea behind cleaning your pad on the fly... you can remove a majority of the spent product and removed paint and then get back to running the buffer... buffing out an entire car already takes a l-o-n-g time... stopping to do some kind of pad cleaning procedure that isn`t quick and easy keeps you from buffing on the paint.
Fast methods include,
- Pad Washers
- Cleaning your pad on the fly with a terry cloth towel
- Using a nylon pad conditioning brush
- Using a Spur if you`re using a wool pad on a rotary buffer
Slow methods,
Note: These methods work great but they take you away from buffing on the car = more time to buff out the car.
- Washing your pads in a bucket of water
- Washing your pads in a sink under running water
Mike Phillips
Host - Competition Ready on Velocity Channel
Director of Training Autogeek & Marine 31
Competition Ready Facebook Page
Mike Phillips Facebook Page
Twitter
Instagram
Click on a book to get your own copy.
-
04-27-2011, 12:57 PM #5Administrator
- Join Date
- Aug 2003
- Location
- Stuart, Florida
- Posts
- 332
- Post Thanks / Like
Re: How to maximize the ability of your DA Polisher for show car results!
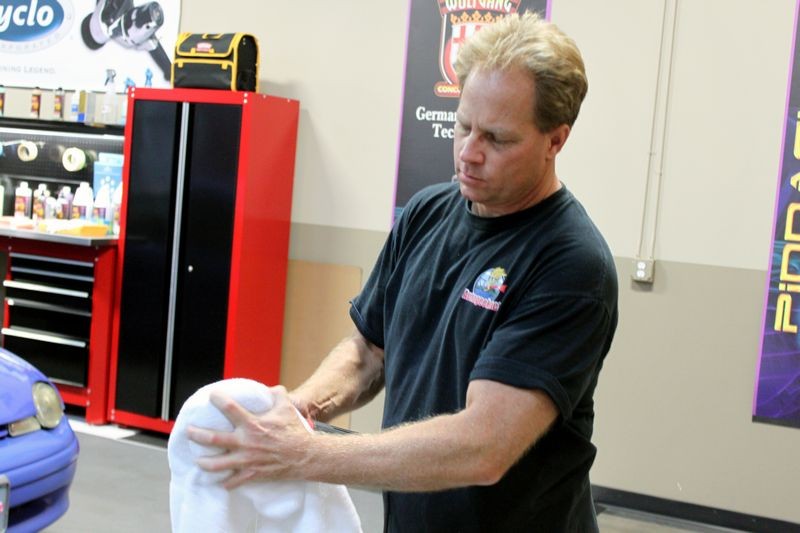
How-to clean your foam pad on-the-fly
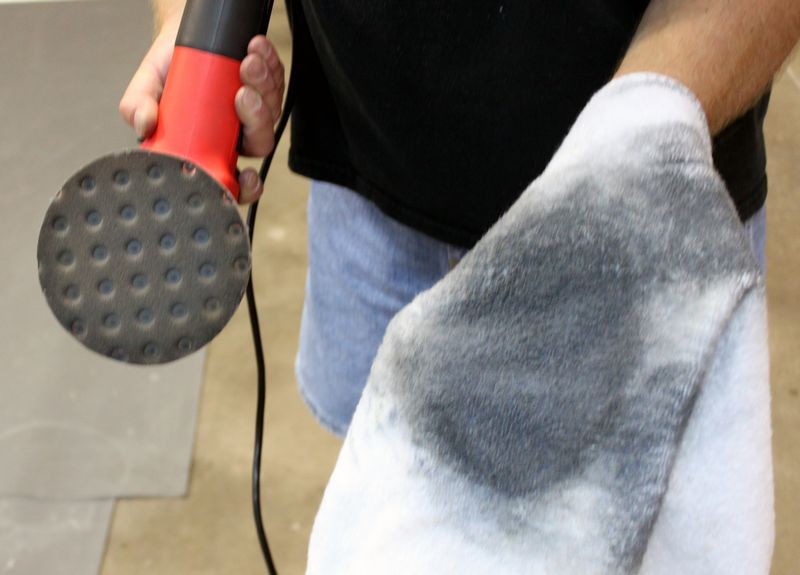
When using a dual action polisher to remove below surface defects with any type of abrasive product youre going to have two things building up on the face of the foam pad that you need to clean off.
- Spent residue - From the product youre using.
- Paint - Small particles of paint that are coming off the car as you abrade the surface
If youre working on a clear coat finish then keep in mind you wont see the paint residue building-up on the pad because the clear coat paint is clear.
Make sense?
If youre working on a clearcoat finish, all you`re going to see is the color of the product that youre using. For example if youre using a white colored polish youll see white residue building-up on the pad.
Now if youre working on as single stage paint then youll see the color of the paint on the car on the face of your foam pad,. For example if youre working on a single stage yellow paint system then youll see yellow paint on the face of your foam pad.
The important thing to understand is that as you work on the car with your polisher youre going to be removing a little paint and theres going to be used-up product and paint building-up on the face of the foam pad. It`s important to clean this gunk off your pad often.
So the question is, how to you clean this gunk off the pad?
The answer is theres a number of ways to clean your foam pad, the three most common are,
- Pad Washer
- Nylon Brush or Pad Cleaning Brush
- Terry Cloth Towel
Out of the 3 options listed above, cleaning your pad on the fly is probably the most popular because its fast, and most people have a terry cloth towel in the linen closet that they can use to clean the pad.
The best way to clean a pad is with a pad washer but before you can use a pad washer you must first own one. Pad washers are worth their weight in gold if you buff cars out with any kind of regularity. If however youre just buffing out your own personal cars, then chances are you dont own a pad washer but chances are very good you do own a terry cloth towel or two that you can use to clean your pads on the fly.
Brushes work good if youre using a rotary buffer but the only way you can use one with DA Polisher is to turn the polisher off, hold the polisher and pad in such a way that the pad wont spin and then rub the brush over the face of the pad to scrape off the residue.
While this works, it means turning the polisher off, (now you`re not buffing out the car, remember the time issue?) and grabbing your brush and then brushing the pad. Nothing wrong with this but when you consider how long it already takes to do the cleaning step, (about 4-6 hours for an average size car and thats if your good at this and if you work fast and dont take any breaks. So stopping the polisher and using a brush to clean the pad works but its not as fast or effective as using a terry cloth towel.
The whole idea and success behind the cleaning your pad on the fly technique is in that it allows you to clean your pad quickly, (thats the on the fly part), and then quickly get back to work.
Again, buffing out an entire car using a dual action polisher from start to finish is an all day job. There is no time for lollygagging. If you lollygag or take long breaks, you either wont get the job done in one day or youll sacrifice doing a quality job during the cleaning step in order to get to the waxing step so you can put the car back into service.
So lets take a look at how to clean your pad on the fly
Cleaning your pad on the fly is where you take a terry cloth towel, usually a medium size hand towel works best, you fold it in two and then simply hold the towel against the face of the pad and then turn the polisher on and use your hand thats holding the towel to push the towel into the foam. This will act to draw any excess liquid out of the foam and any excess residue off of the face of the pad.
This is me using the "Clean your Pad on the Fly Technique"

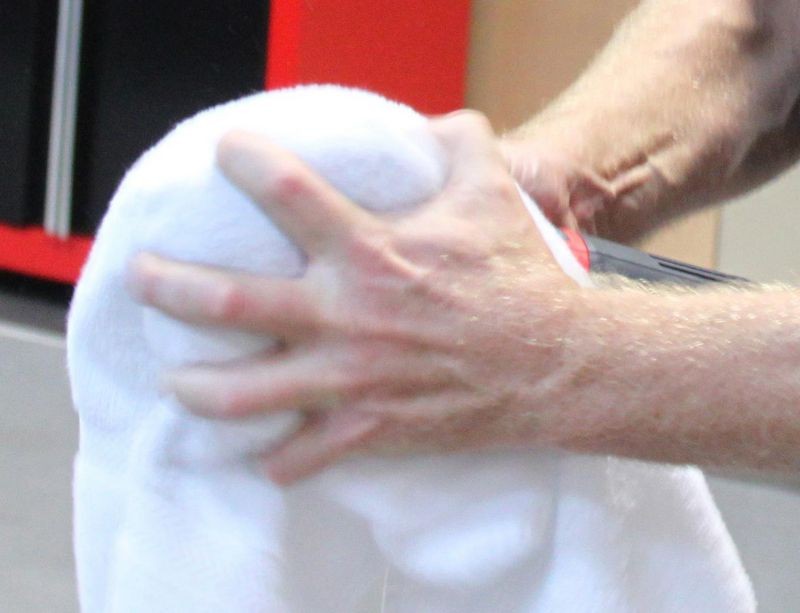
This technique really only works well with the Porter Cable style DA Polishers.
There`s a modified version of this that works with rotary buffers...
Question: Why use terry cloth instead of microfiber?
Answer: Great question!
100% cotton terry cloth is very good at absorbing liquid, so when you push the terry cloth into the foam the liquid in the foam will transfer into the terry cloth fibers through capillary action where the cotton fibers will more or less hold or trap the liquid inside of themselves.
Theres more to it than that however, the nap of terry cloth, that is the little cotton loops, will help to slice into the caked and gummy reside which will loosen its hold so the residue will transfer to the towel as well as some will fall to the ground.
Compared to most microfiber polishing cloths with a nap, not the type that has flat woven surface, the terry cloth nap, (the nap is the the little tiny loops of cotton fiber), is more stout and its this extra stoutness that enables a large, nap terry cloth towel to work better to break-up the residue on the pad.
So its both the absorbency of the cotton fibers plus the larger size of the cotton nap that together make a terry cloth towel better for cleaning your pad on the fly.
Does that make sense?
The nap of 100% Cotton Terry Cloth Toweling

Conversely, isnt one of the reasons microfiber polishing cloths are so popular for wiping paint is because the fibers are microscopic in size and thus are more gentle to paint than larger cotton fibers? (The answer is yes)
You can use what you like and make up your own mind. Besides the case Ive made above for using terry cloth another reason is to save your microfibers for where they excel best and thats wiping residues off polished paint.
Some might also make the case that 100% cotton is better at absorbing while microfiber materials are better at adsorbing but thats probably getting just a little too deep for what is actually a very simple method of cleaning your foam pads while buffing out a car.
Try both the next time youre working on a car and come to your own conclusion but for me Ill use terry cloth towels for removing residues off my pads and Ill save my microfibers for carefully cleaning residues off paint.
Question: What about pad cleaning brushes?
Answer: I touched briefly on this above, but let`s drill down a little deeper. Pad cleaning brushes or even a nylon toothbrush work great for cleaning residue off the face of a foam pad when the foam pad is on a rotary buffer but they don`t work well at all when the pad is on a dual action polisher.
About the best you can hope for is to clean the very center of the pad when the tool is turned on but as you draw the bristles of the brush towards the outside of the pad the increased pressure over a small area, (the bristles of the brush pushing down on the foam), is enough pressure to engage the clutch in the tool and stop the pad from rotating.
The brush only cleans the pad if the pad is rotating. Thus brushes don`t work well for cleaning pads on dual action polisher when you`re trying to clean the pad while the polisher is turned on. Give it a try sometime and you`ll see exactly what I mean.
For years when someone asks about the cheapie rotary buffers you can buy at Harbor Freight for buffing out paint, I would always mention that if nothing else, they make a great pad cleaner. That is take your dirty pads and one at a time place them on the backing plate of the rotary buffer and then use the rotary buffer to clean your pads. Rotary Buffers are direct drive tools and have a lot of power and a little brush held against the face of the pad isn`t enough to slow the tool down so they work great for cleaning pads as well as removing a lot of paint quickly if you`re using a RB to buff-out paint.
The cleaning your pad on the fly technique works well for all the popular dual action polishers on the market including,
- Porter Cable 7424XP
- Porter Cable 7424
- Porter Cable 7336
- Ultimate Detailing Machine The first generation was Autopias design. The second generation is a re-badged Porter Cable 7424
- Meguiars G100a Re-badged Porter Cable 7424, came with a lifetime warranty
- Meguiar`s G100 Re-badged Porter Cable 7424, came with a 1 year warranty.
- Meguiars G110 Meguiars design
- Meguiars G220 Meguiars design 220 Volts
- Griots Garage Professional Random Orbital Polisher Griots design
- Shurhold DA Polisher
- DAS-6 PRO Dual Action Polisher
Mike Phillips
Host - Competition Ready on Velocity Channel
Director of Training Autogeek & Marine 31
Competition Ready Facebook Page
Mike Phillips Facebook Page
Twitter
Instagram
Click on a book to get your own copy.
-
04-27-2011, 01:00 PM #6Administrator
- Join Date
- Aug 2003
- Location
- Stuart, Florida
- Posts
- 332
- Post Thanks / Like
Re: How to maximize the ability of your DA Polisher for show car results!
How to use a microfiber bonnet to remove dried wax by machine
Indigo on Hydro


If you own a DA Polisher, like a Porter Cable, Meguiars or Griots Garage DA Polisher, then heres how you can use your polisher to remove dried wax.
Removing dried wax by machine works best when you apply a thin coat to start with and the best way to apply a thin coat of wax is by machine. Of course if you already own a DA Polisher than you probably already know this and already apply your waxes by machine. So lets take a look at removing dried wax by machine.
Waxes that dry to a haze
The first thing I want to point out is removing wax works best if youre using a wax that is supposed to dry to a haze, this is because once its grip is loosened from the paint because its dry it doesnt try to stick to the paint. Waxes that dry to a haze also wont dampen the microfiber bonnet and the nap wont load up as easily or quickly as will happen when removing a wipe on, wipe off wax.
Wipe On, Wipe Off Waxes
First, if youre removing a wax that is still wet it wont take very long for the wetness of the product to dampen the nap of the microfiber bonnet and tend to load up until the nap is coated with wet wax. At this point it will more or less stop removing the wax efficiently until you change to a dry microfiber. So while it can be done, removing wax by machine works best when used to remove waxes that have dried to a haze.
Firm, Dense Pads
The key to removing dried wax using a DA Polisher is a firm pad like a foam cutting pad or a Lambswool pad. My personal preference has always been to use a foam pad because it provides a level of cushion due to the nature of the foam cell wall structure, the Lambswool has no foam cushion, it is simply a soft lambswools skin with a Hook-n-Loop backing glued to the skin side of the Lambswool. The foam cushioning feature also enables the pad to conform to a curves and body lines better than the hard, flat feature provided by the lambswool pad with a microfiber bonnet over it.
Any of these foam pads work well for removing dried wax,
5.5 Lake Country Flat Yellow Cutting Pad
5.5 Lake country Flat Orange Light Cutting Pad
5.5 Lake Country CCS Yellow Cutting Pad
5.5 Lake country CCS Orange Light Cutting Pad
6 Lake Country Purple Kompressor Pad
6 Lake Country Orange Kompressor Pad
Dedicated Pad
Now this is important, when using microfiber bonnets to remove dried wax you only want to use,
- Dry pads
- Clean pads
If the pad is wet, it will transfer its liquid to the microfiber and get it wet; this will dramatically reduce its ability to remove wax. So dont try to use a pad thats either wet with product or wet after being washed clean.
Clean pads
If your pad has been previously used to apply some kind of paint care product and its dry, the dried residue in the pores of the foam pad will shake loose and accumulate inside the bonnet. This will contaminate that side of the bonnet making it unusable.
The best thing to do is to dedicate a pad to go with your bonnets and dont ever use that pad for any machine cleaning or polishing work. If possible, you can mark the back with Sharpie permanent marker.
Reversible Bonnets
Microfiber bonnets are pretty much all reversible so you can use one side till it loads up with dried wax and then remove it, turn it inside out, give it a shake and put back onto your buffing pad and get back to work with the other side. Ill show you my technique for cleaning your bonnet on the fly and often times you can remove all the wax off an average size car with just one side of bonnet.
Swipe Test
The first thing you want to do is to test the wax to make sure its dry and ready to remove and you do this with whats called the Swipe Test. Once the swipe test shows the wax is ready to remove, you can begin removing the wax by machine.
Removing the Wax
It doesnt matter much where you start but the normal protocol would be to start where you started when you applied the wax and then follow your path of travel. Another way is to just start at the top and work your way down.
Work Area Size
Basically as far as you can reach and manage comfortably. When removing defects you only want to work a small section at at time. When applying a liquid wax by machine and when removing dried wax by machine you can basically tackle as large an area as you like.
Speed Setting
You need a fast speed setting to remove the wax, I tend to use the 5.0 Speed Setting as its not as violent as the 6.0 speed setting but you need to at least be on the 5.0 speed setting.
Downward Pressure
You want to use firm downward pressure when removing the wax. The reason for this is you want the nap of the microfiber slicing into the coating of wax and then breaking it up and this cannot be accomplished with light pressure.
VERY IMPORTANT
Dont lift the face of the buffing pad off the car at any time when operating the polisher at high speeds, if you do the pad rotation will quickly speed up and chances are very good your buffing pad will fly off the backing plate and land on the ground somewhere where it will become contaminated with dirt and unusable.
A technique for how to move the polisher from panel to panel without having the pad fly off even though you dont turn the polisher off is to at the same time you lift the pad off the surface, quickly place your clean hand against the pad, this won`t hurt you and will keep the pad from flying off the polisher till you touch it down again on a new panel, for example going from the roof to the hood, or from the hood to a side mirror, etc.
Cleaning your bonnet on the fly
As you work your way around the car removing dried wax or paint sealant, you will get a build-up of removed residue on the face of the microfiber bonnet. While you have the option to remove the bonnet and reverse it and then place it back onto the buffing pad to use a clean side, what I do is in one smooth action, lift the oscillating pad off the surface and at the same time hold the fingernails of my 4 fingers against the bonnet with enough pressure to keep the pad from flying off the polisher but not so much that I stop the pad from rotating, and then let my fingernails remove any product residue.
This works well enough to quickly remove any product build-up and then get back to work and thats the idea of doing anything on the fly
Benefits to machine removal of wax
First of all, removing wax by machine is personal preference; some people like this technique while others prefer to simply wipe-off waxes by hand.
Using a microfiber bonnet over a foam cutting pad provides equal pressure over the entire face of the pad and removes any pressure points created typically by your fingertips when wiping off by hand.
For some people, letting the machine do the work might be a physical advantage than using their arms and shoulders to wipe the wax off, just depends upon the physical limitations of the person.
Variation on the bonnet
Some people will simply place a microfiber flat onto the paint and then place a clean, dry buffing pad against the microfiber and remove wax using the microfiber trapped between the pad and the paint. Im not a big fan of this method because the microfiber towel can easily work its way out from under the pad, especially if you try this on a vertical panel.
Mike Phillips
Host - Competition Ready on Velocity Channel
Director of Training Autogeek & Marine 31
Competition Ready Facebook Page
Mike Phillips Facebook Page
Twitter
Instagram
Click on a book to get your own copy.


 Reply With Quote
Thread Information
Users Browsing this Thread
There are currently 1 users browsing this thread. (0 members and 1 guests)
Similar Threads
-
Could a pro detailer use a DA polisher and get good results?
By Toy_Cam_Ed in forum Car DetailingReplies: 23Last Post: 06-20-2012, 01:03 PM -
MAXIMIZE your REFERRALS
By buda in forum Detailing Business Management & MarketingReplies: 0Last Post: 06-24-2011, 07:36 PM -
Anything to use between WG twins to maximize look?
By Spilchy in forum Car DetailingReplies: 3Last Post: 08-13-2004, 10:34 AM -
Results of Vector circular polisher
By JHowell1976 in forum Machine Polishing & SandingReplies: 17Last Post: 12-25-2003, 01:26 PM -
Best Results with PG RO Polisher (SMR Sucks)
By highspeeddata in forum Car Detailing Product DiscussionReplies: 13Last Post: 04-04-2002, 12:44 PM
Bookmarks